


How to Light Up Your LEGO City: A Beginner's Guide to LEGO Light Kits
Have you ever looked at your LEGO city and thought it was missing something? LEGO light kits can add that missing spark, bringing your brick-built world to life with a touch of magic. But diving into the world of LEGO lighting can seem daunting. The cost, the complexity – it can be a lot! This guide will walk you through the basics, showing you how to illuminate your LEGO creations without breaking the bank or losing your mind.
Why Light Up Your LEGO City?
Imagine your LEGO buildings glowing softly in the dark, casting warm light onto the streets of your city. That's the power of LEGO light kits. They transform static models into dynamic displays, adding depth, realism, and a whole lot of fun. It's like giving your LEGO world a soul.
Understanding LEGO Light Kits
Before you start wiring up your bricks, let's understand what LEGO light kits are all about. There are two main types of kits you'll encounter: individual-light kits and pre-corded kits.
- Individual-Light Kits: These are the kind you should consider. Each light is separate and plugs into a central board. This offers you a ton of customization.
- Pre-Corded Kits: These have lights already wired together, which can limit your flexibility.
Why Individual Lights are Preferred
Individual light kits provide flexibility for custom lighting. Because each light is separate, you can decide which lights go where. Individual lights also make troubleshooting easier. If one light goes out, you only need to replace that light, not the whole circuit.
The Price Point Advantage
One of the biggest benefits of Bricklume is the price. LEGO light kits can be expensive, especially if you're lighting up a large LEGO city. Bricklume provides a more budget-friendly way to bring your creations to life. And because LEGOs are already so expensive, everyone can appreciate a good deal!
How to Choose the Right Light Kit
With so many options available, how do you choose the right LEGO light kit?
- Look at Product Photos and Videos: Check out the product photos and videos on the company's website. This will give you a clear idea of what the lit-up set looks like.
- Consider the Price and Value: Is the light kit worth the cost? Does it light up the areas you want to highlight?
- Go for the Cheaper Option (if you like both): If you like two different light kits, go for the less expensive one.
Lighting Up a Pre-Built Set: The Sanctum Sanctorum Example
Let's look at an example of a set that's already lit up: the Sanctum Sanctorum. This set uses a Bricklume light kit, and the result is amazing. The lights enhance the set and make it stand out.
The Lighting Process Explained
When you add lights to a LEGO set, you're essentially placing small LED lights under the bricks or studs to illuminate specific areas. Often, these areas are translucent, like the transparent yellow or green crystals in the Sanctum Sanctorum. This makes them look really cool when lit up.
Connecting the Lights and Powering the Set
After you've placed all the lights, you connect them to a series of panels. Then, you connect the panels to each other. Eventually, one of the panels connects to a power source. This creates an electrical circuit that powers all the lights in the set. The cord that connects to the panel has a USB port on the other end. You can plug that into any USB hub or a USB block to power the set.
Addressing the Fear Factor
LEGO light kits can seem intimidating, especially if you're new to electronics. Where do you even start? Where do you put the lights? How do you run the cords? The good news is that the instructions are thorough and step-by-step. They show you exactly where to place each light and how to reattach the pieces. If you ever have questions, customer support is available to help.
Custom Lighting a MOC Build: The Cozy House Project
Once you're comfortable lighting pre-built sets, you can try custom lighting a MOC (My Own Creation) or an alternative build. I lit up an alternative Cozy House build I found on Rebrickable.
Applying Learned Knowledge
After you’ve lit a few sets, you'll know how to weave the cords through the bricks and how certain lights work. You can recreate those techniques when you're doing a custom lighting job.
The Core Principle: Lights to Panel to Power
At the end of the day, it's just lights that go to a panel. As long as all the panels connect to a power source, you'll get light.
Testing as You Go
When installing a light kit, I always test the lights with a little battery pack after installing a few lights. That way, if a light has an issue, you'll know right away. The set won't light up if there's a faulty light. If that happens, you just need to find out which light is the problem.
Avoiding Common Mistakes
Be gentle when you're pushing down on the bricks. If you push too hard, you can cut off the connection. Make sure the bricks are gripping enough, but don't Hulk out and force them down.
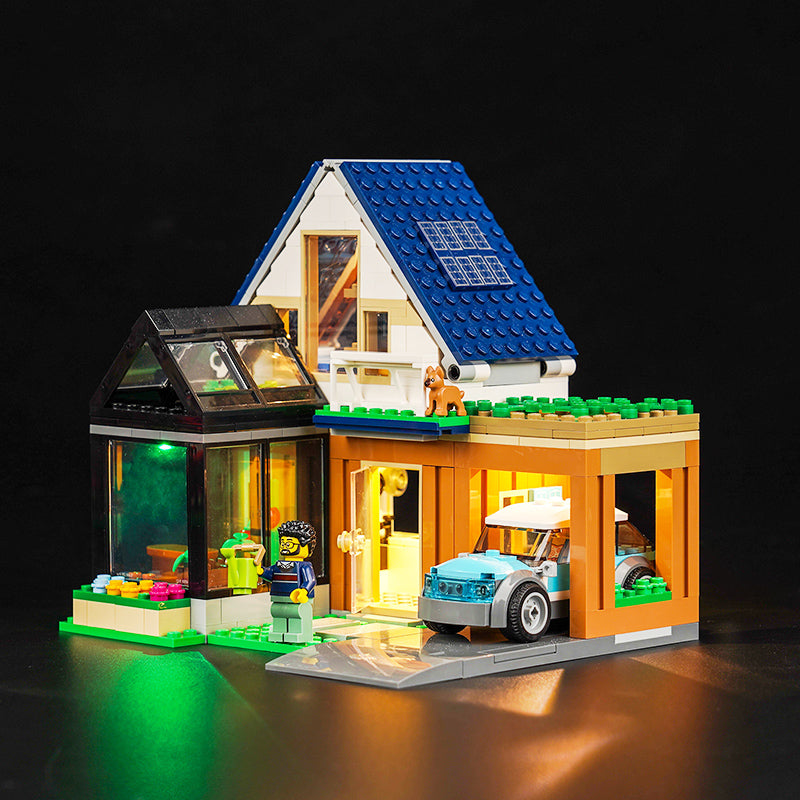
There are a lot of great LEGO sets available, have you considered the Light Kit for LEGO City Family House 60398? It's a great set to start with!
The Grand Finale: The Lit-Up Cozy House
After installing the lights in the Cozy House, I added a sidewalk and some minifigures. The first floor is lit up, and the outside lights are on. Upstairs, the bed lamps are lit up. Adding the minifigures brought the scene to life.
Adding Minifigures for Storytelling
Adding minifigures to the scene creates a narrative. You can pose them in different ways to tell a story. In the Cozy House, I had a minifigure inside, and the dad and son were outside.


